
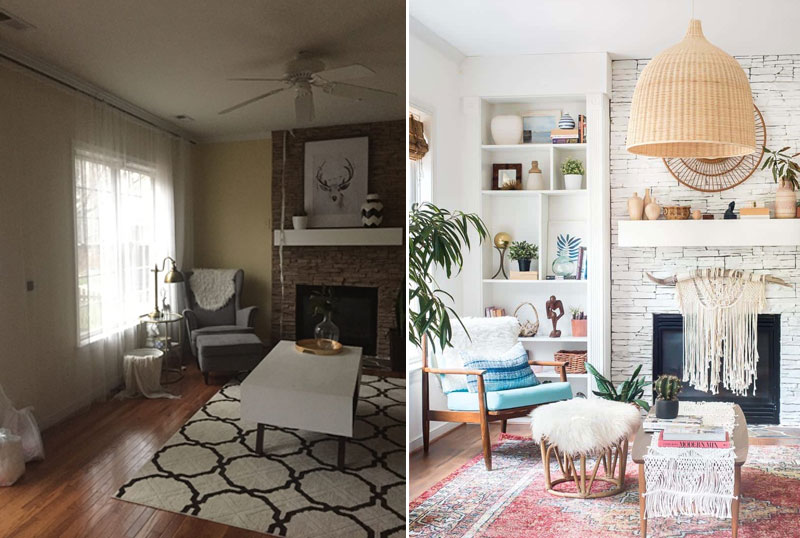
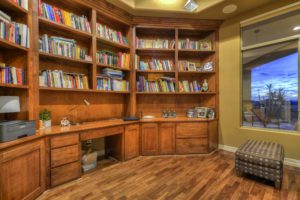
 I still walk in sometimes and can’t even believe it’s the same room. Of course, there have been many other updates and projects to get this look, but the shelves definitely set the stage.
Let’s get started!
I still walk in sometimes and can’t even believe it’s the same room. Of course, there have been many other updates and projects to get this look, but the shelves definitely set the stage.
Let’s get started!
Materials
Note: Always measure first to get your supplies right. Our measurements were not exactly equal, with a width of 41″ on one side of the fireplace and 43″ on the other. But we compensated with our build-out around it, and it made no difference at all.- Two BILLY bookcases with extension, or similar product
- Two 1″ x 12″ x 6′ whitewood boards (for tops)
- Two 1″ x 12″ x 10′ whitewood boards (for visible sides next to fireplace)
- Two 1″ x 4″ x 12″ common boards (Each cut to length, then screwed into the wall studs flush behind each shelf for support. This compensates for the 1″ difference in the whitewood boards and BILLY bookcase depth)
- 3″ drywall screws to attach common board to studs
- Three 2″ x 4″ x 10′ boards (for hidden sides next to walls and for header frame)
- Eight 2″ x 4″ x 11″ pieces (to fill gaps between shelf and whiteboard on fireplace side)
- Four 4 1/4″ x 1 1/8″ x 9″ plinth blocks of choice
- Four 4 1/4″ x 1 1/8″ x 4 1/4″ plinth blocks of choice
- Four 15/32″ x 3 9/16″ x 96″ strips of millwork molding (to cover the left and right edges of each shelf)
- Eight 1 1/2″ x 2″ x 1 3/8″ 18-gauge steel brackets and nails
- Brad nails (or finish nails)
Tools
- Miter saw or skill saw
- Brad nailer (recommended)
- Drill kit
- Tape measure
Let’s build!
- Mark your studs, and screw the cut 1″ x 4″ common board to the wall and into the studs with the drywall screws, spaced every 6-12″. Space the strips a few feet apart from top to bottom to get the best support.
- Cut out the crown molding, shoe molding and baseboard if needed.
- Press the bookcases flush to the strips on the walls, center them and attach the steel brackets to the bookcases and the strips screwed to the walls.
- Measure (ceiling to floor) the wall side where you want the outer edge of your shelf.
- Cut the 2″ x 4″ to length and attach to the wall.
- Measure (ceiling to floor) the fireplace side where you want the edge of your shelf.
- Cut the 1″ x 12″ whiteboard to length and attach using 2″ x 4″ blocks to hold the gap.
- Measure from the inside of the 2″ x 4″ to the inside of the 1″ x 12″ across the top of the bookcase. Cut another 2″ x 4″ to fit the space, and screw it in on each side.
- Measure and cut the 1″ x 12″ whiteboard designated for the top. Brad nail across the front first and then the side.
- Now place and brad nail the plinth blocks.
- Next, measure and cut the millwork to length, and brad nail that into place.
- Arrange shelves as desired. I cut a few in half to make the vertical breaks and used another 1″ x 12″ to fill the remaining longer gaps to my liking.
- Paint, stain and decorate as desired. Here’s our finished product!
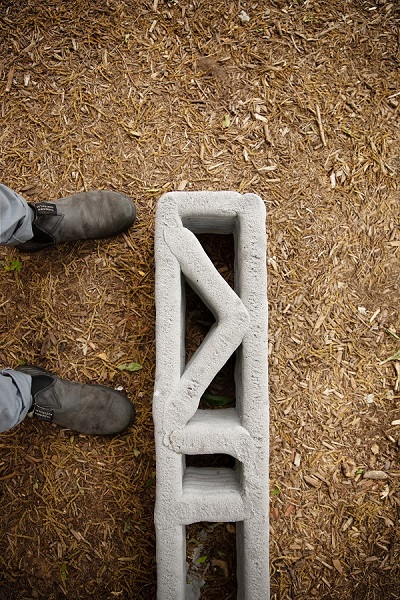
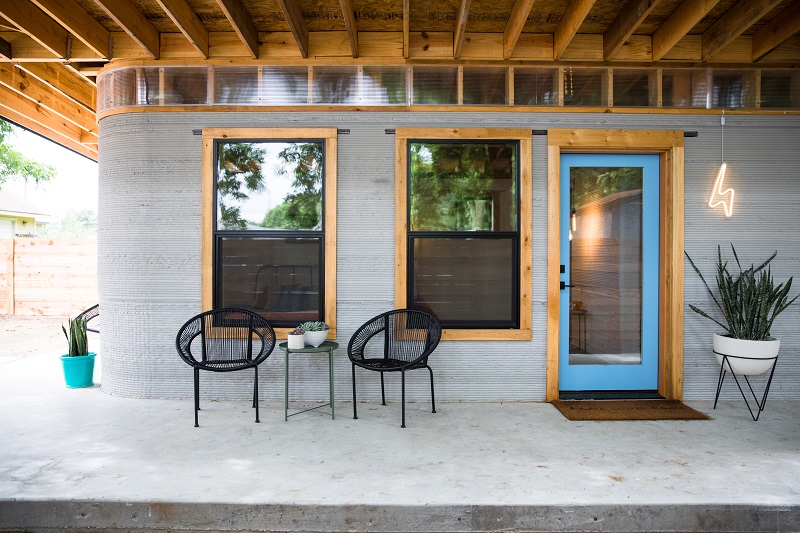 But 3D printing could be the silver bullet. ICON, a construction technologies company, designed a 3D printer to produce homes. A single-story home, with a total footprint measuring 600 to 800 square feet, can be printed in underserved communities in less than 24 hours.
The cost? Just $4,000.
“3D printing can deliver a house — and I mean fully deliver ready to move in — for about 30 percent less than conventional building,” explains Jason Ballard, ICON’s CEO and cofounder.
But 3D printing could be the silver bullet. ICON, a construction technologies company, designed a 3D printer to produce homes. A single-story home, with a total footprint measuring 600 to 800 square feet, can be printed in underserved communities in less than 24 hours.
The cost? Just $4,000.
“3D printing can deliver a house — and I mean fully deliver ready to move in — for about 30 percent less than conventional building,” explains Jason Ballard, ICON’s CEO and cofounder.
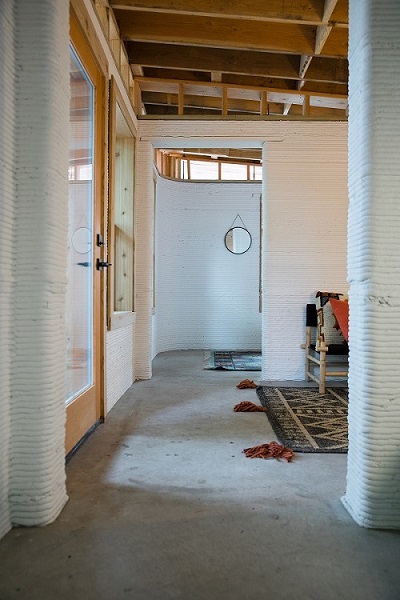
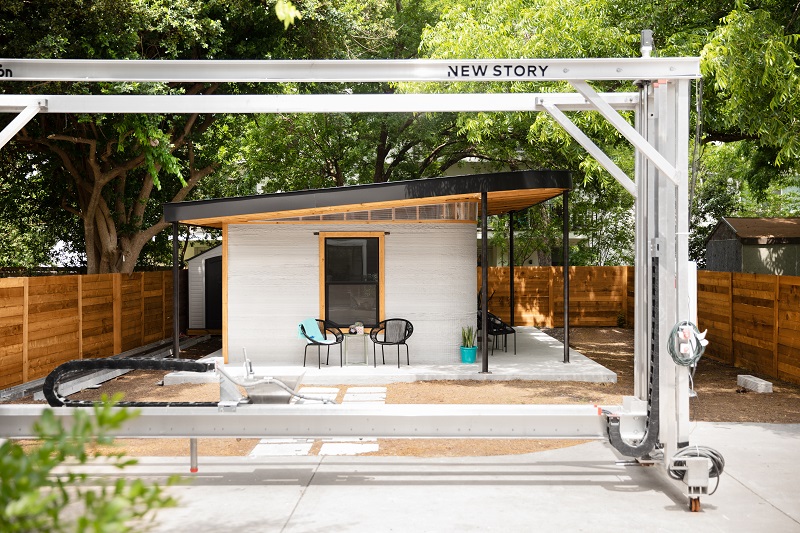 About a year ago, New Story and ICON partnered to print 100 homes in El Salvador. To test the technology, they printed a prototype in Austin, TX this March. It’s the first site-printed, permitted 3D-printed home in the U.S.
“One of our favorite things to hear about as we unveiled it was, ‘Holy cow, I would live in that house,’” Ballard recalls. “And that really made us feel like we had succeeded.”
About a year ago, New Story and ICON partnered to print 100 homes in El Salvador. To test the technology, they printed a prototype in Austin, TX this March. It’s the first site-printed, permitted 3D-printed home in the U.S.
“One of our favorite things to hear about as we unveiled it was, ‘Holy cow, I would live in that house,’” Ballard recalls. “And that really made us feel like we had succeeded.”
 The prototype shows off what the technology can do — like printing curved walls and a sloped roof as easily as straight lines. The Austin home was printed in 47 hours, with the machine at quarter speed. ICON expects homes to be printed in 11 to 12 hours at full speed.
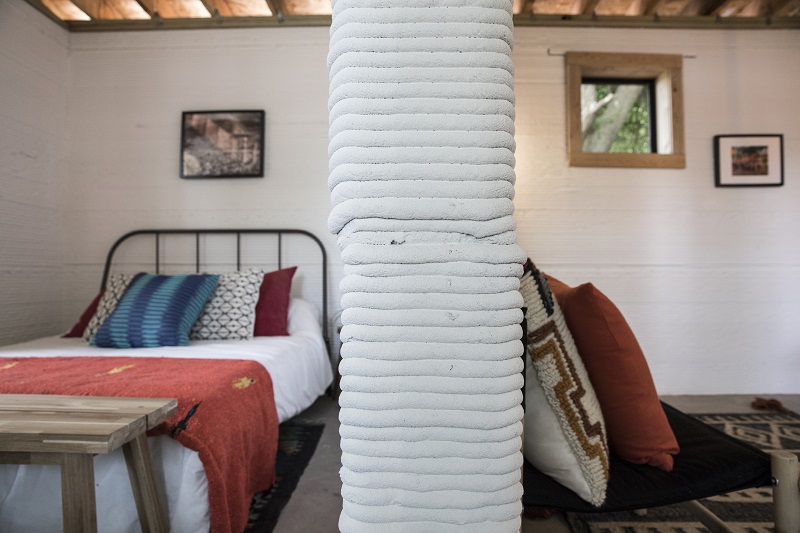
The prototype was printed to last in a developing country, not just Texas. Made of concrete, it’s strong and cool enough to withstand extreme temperatures, hurricanes and even earthquakes. Bonus: Printing homes produces zero waste.
The prototype shows off what the technology can do — like printing curved walls and a sloped roof as easily as straight lines. The Austin home was printed in 47 hours, with the machine at quarter speed. ICON expects homes to be printed in 11 to 12 hours at full speed.
The prototype was printed to last in a developing country, not just Texas. Made of concrete, it’s strong and cool enough to withstand extreme temperatures, hurricanes and even earthquakes. Bonus: Printing homes produces zero waste.
 “We wanted to make this feel like the kind of house you could feel proud to live in,” Ballard adds. Knowing concrete can feel stark and uninviting, they planned the design to incorporate lots of natural light. The windows, roof and doors were added after the printing was complete.
 While the homes in El Salvador will be similar in size to the prototype, each design will be custom. New Story hosts workshops in each country they serve, asking families what they want in their future homes.
“Unfortunately, they’re not used to being asked for their input and their opinions,” Hagler says. “But when it finally clicks that we not only care, but we’re actually going to implement what they say — it’s really beautiful to watch.”
While the homes in El Salvador will be similar in size to the prototype, each design will be custom. New Story hosts workshops in each country they serve, asking families what they want in their future homes.
“Unfortunately, they’re not used to being asked for their input and their opinions,” Hagler says. “But when it finally clicks that we not only care, but we’re actually going to implement what they say — it’s really beautiful to watch.”
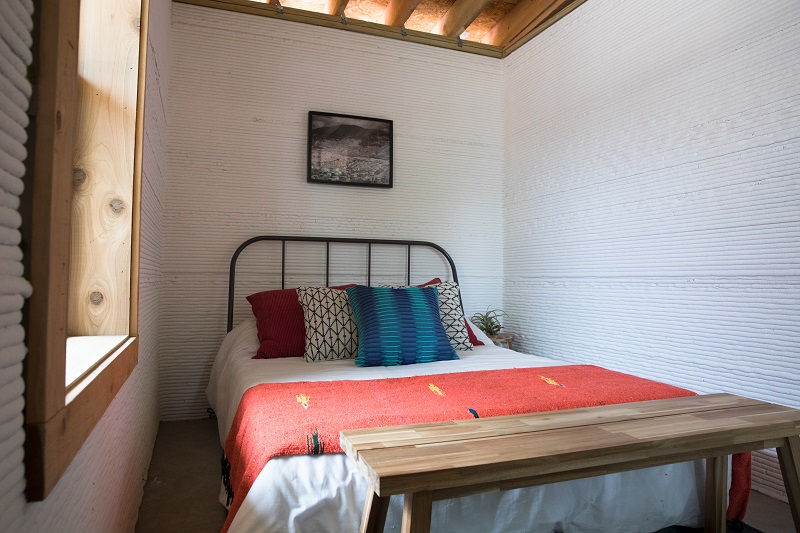
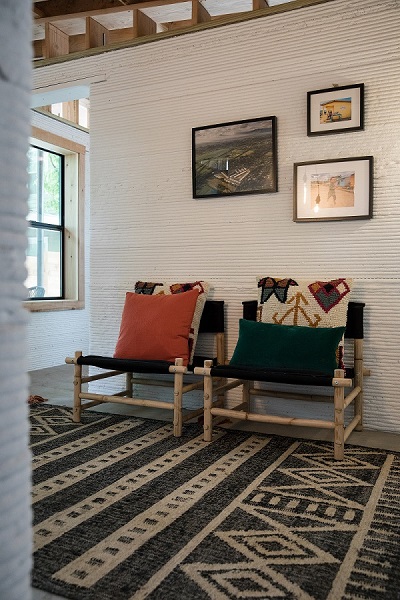 Each home will have 1 to 2 bedrooms, a bathroom with a shower and toilet, and a living room. The rest is up for debate.
“It’s about shelter, but it’s also about dignity, respect and ownership of your home,” Hagler adds.
Each home will have 1 to 2 bedrooms, a bathroom with a shower and toilet, and a living room. The rest is up for debate.
“It’s about shelter, but it’s also about dignity, respect and ownership of your home,” Hagler adds.
 If the printing goes well, more communities will follow.
“This really is a paradigm shift,” Ballard notes. “With this technology, we can imagine for the first time what it would be like to end homelessness as a lack of shelter.”
If the printing goes well, more communities will follow.
“This really is a paradigm shift,” Ballard notes. “With this technology, we can imagine for the first time what it would be like to end homelessness as a lack of shelter.”
 By
By 

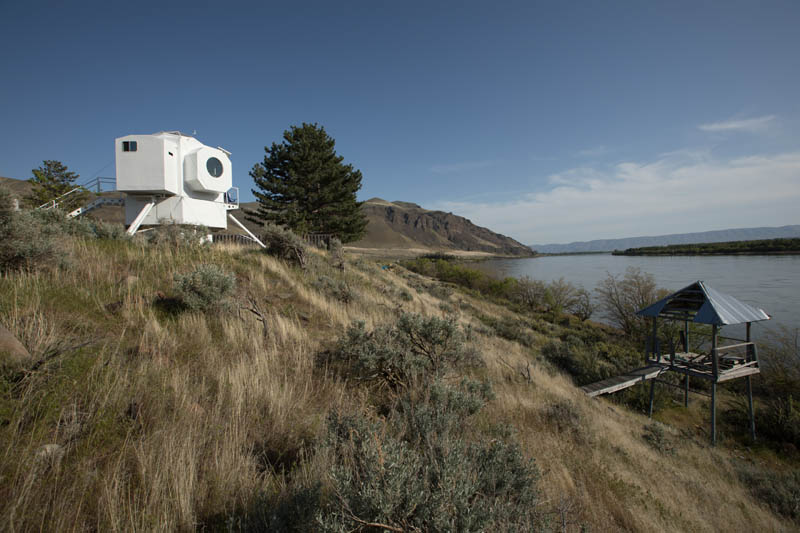 Nestled on the banks of the Columbia River in central Washington, the roughly 250-square-foot home is hexagon-shaped, perched nearly 9 feet above the ground on three massive steel beams.
 Inside, earthlings are greeted by an open floor plan. A breakfast nook has a porthole-shaped window overlooking the river and the hillside; a kitchen with stainless steel appliances provides space to cook up a feast for an astronaut.
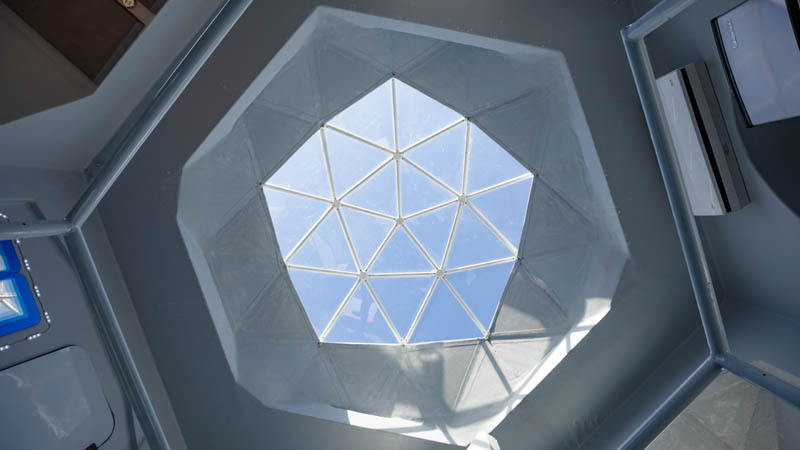
 A large geodesic dome skylight showers the room with sunlight.
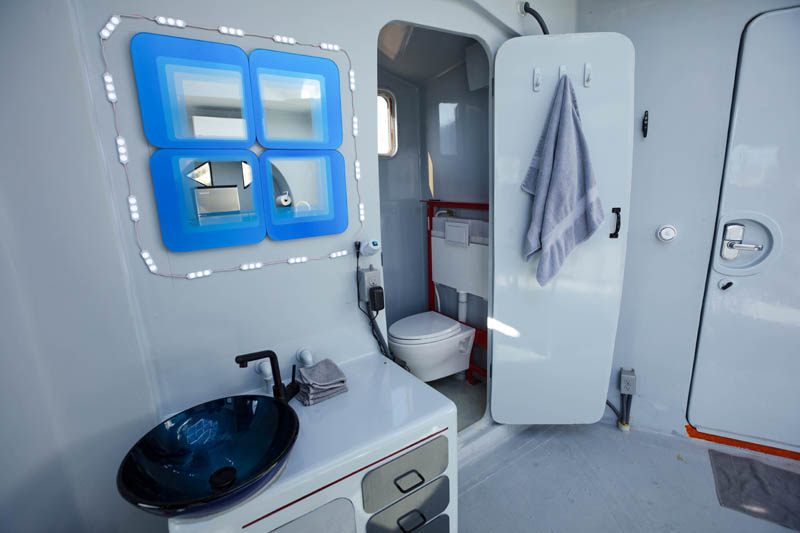
 Just off the bathroom, a deep-blue sink and cerulean-colored mirror have a Mid-Century Modern feel (appropriate, considering humans first walked on the moon in 1969).
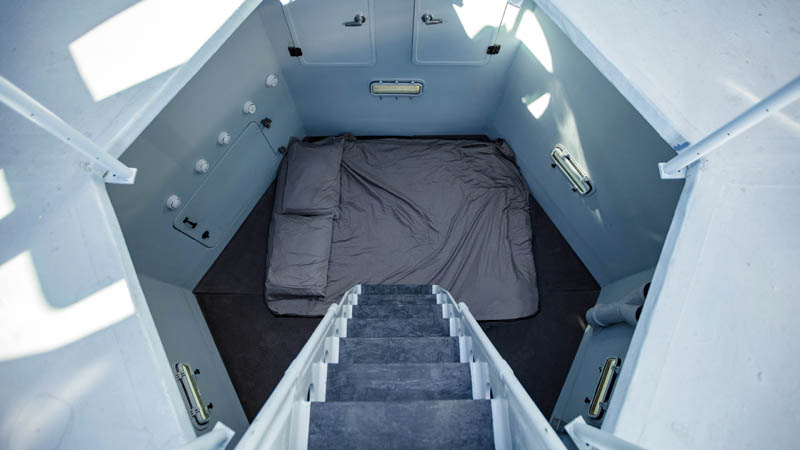
 The bedroom sits down a small ladder and can comfortably sleep two people.
 Upstairs, there’s enough room for a small outdoor deck where you can gaze at area wildlife, including eagles and lynxes.
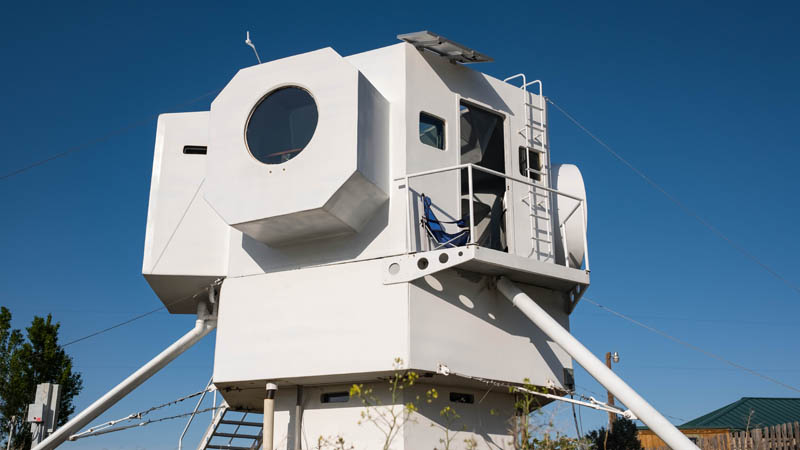 If the space reminds you of the tiny, well-intentioned living quarters of a boat, it’s no coincidence. The lunar lander’s owner and designer, Kurt Hughes, is a boat designer by trade.
He translated his three decades of boat building to home building — in fact, the wooden table in the dining nook is recycled from the Hughes’ first sailboat.
If the space reminds you of the tiny, well-intentioned living quarters of a boat, it’s no coincidence. The lunar lander’s owner and designer, Kurt Hughes, is a boat designer by trade.
He translated his three decades of boat building to home building — in fact, the wooden table in the dining nook is recycled from the Hughes’ first sailboat.

 By
By 